
How to start a Website for your Business?
A Free Step-by-Step guide for Complete Beginners

Let's get your Website started...
Updated March 2, 2024.

Time of reading: 19 min
Level of Difficulty: Beginners
🦔 You can skip to a specific step if you have already done a thing or two from the list.
1. How to register a Domain name
Step 1: Check if Domain is available
Step 2: Choose a Trusted Domain Registrar
Through our testing and research, we confidently recommend HostArmada for its straightforward domain registration process and excellent service.
They provide a free domain with hosting purchases and a 45-day refund policy.
Other trustworthy choices include Domain.com, Namecheap, and Fastcomet.
2. Get a Web Hosting
You have purchased a domain name, great! Now you need a web hosting!
We recommend choosing a hosting provider that offers a 24/7 support.
After a serious amount of testing and research, one of our Top Choices for starters is HostArmada. It offers:
✔️ Мoney-Back Guarantee for 45 days. This is 15 days longer then most in the industry;
✔️ Free Domain if you buy a hosting plan.
✔️ Great money-saving Plans. You can literally save up to 250 € if you purchase for 3 years and pay only 2.99 € per month for the time period.
✔️ 24/7 support with competent staff;
At the moment HostArmada comes with a FREE domain name when you purchase hosting by them. Click on the +Register a new domain to avail the offer.

You have the right to get a refund in the first 45 days of your purchase.
So you can always get your money back!
3. Start your Site using your Web Hosting
Now that you have your domain and web hosting – your new site is few clicks away!
Fun Fact: According to W3TECH, over 43% of the Websites created in 2023 are built on WordPress.
Here is how to setup your site using HostArmada:
In order to get to the client area, you will need to purchase a plan. We recommend starting with a Shared Hosting Plan such as Start Dock.
…or you can always start with Web Warp which is a perfect Shared Plan for growing!
Step 2. Access cPanel
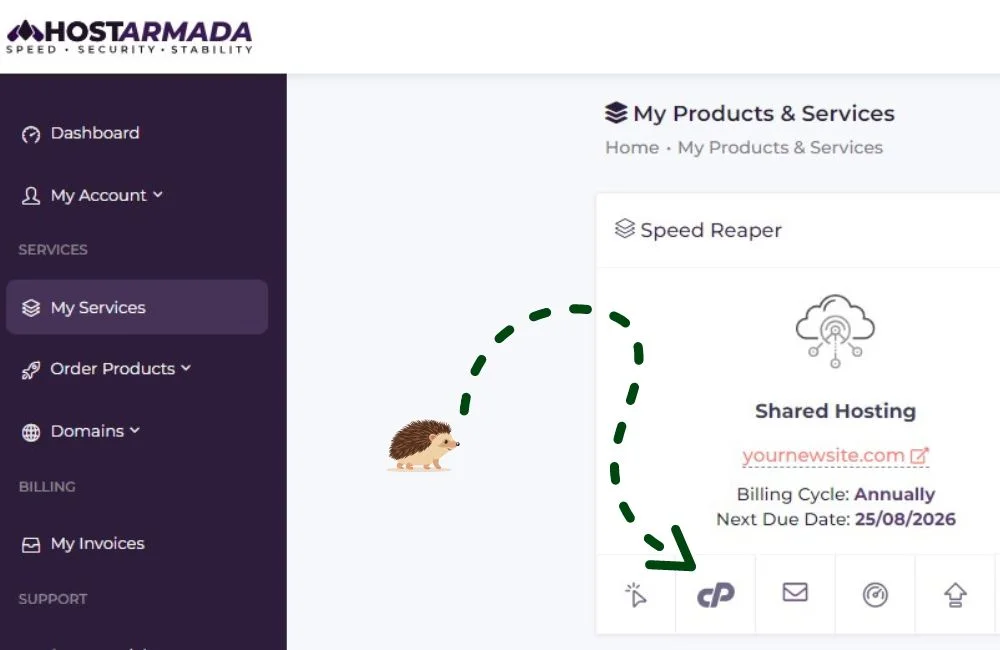
3. Navigate to the Softaculous Apps Installer

(Click here to open a fullscreen version of the GIF)
Congratulations, you have started your website on WordPress just like that!
4. Install a Theme
Now you need to install a Theme!
Good to know: There are over 31.000 available WordPress Themes to choose from – Search Logistics
Our absolute best WordPress Theme for beginners to start with just a couple of clicks is Astra Theme!
Astra totally free of charge offers ready-to-use templates with pre-installed plugins, saving you both time and effort!
Astra Theme is ideal for starting:
- Service Websites
- Online Shops
- Porfolio Websites
- Personal Websites
- Blogs
What is more! You will need a fast loading website and Astra Theme is ranked as one of the lightest and fastest WordPress themes ever created!
Here is how to start with Astra with a few clicks:
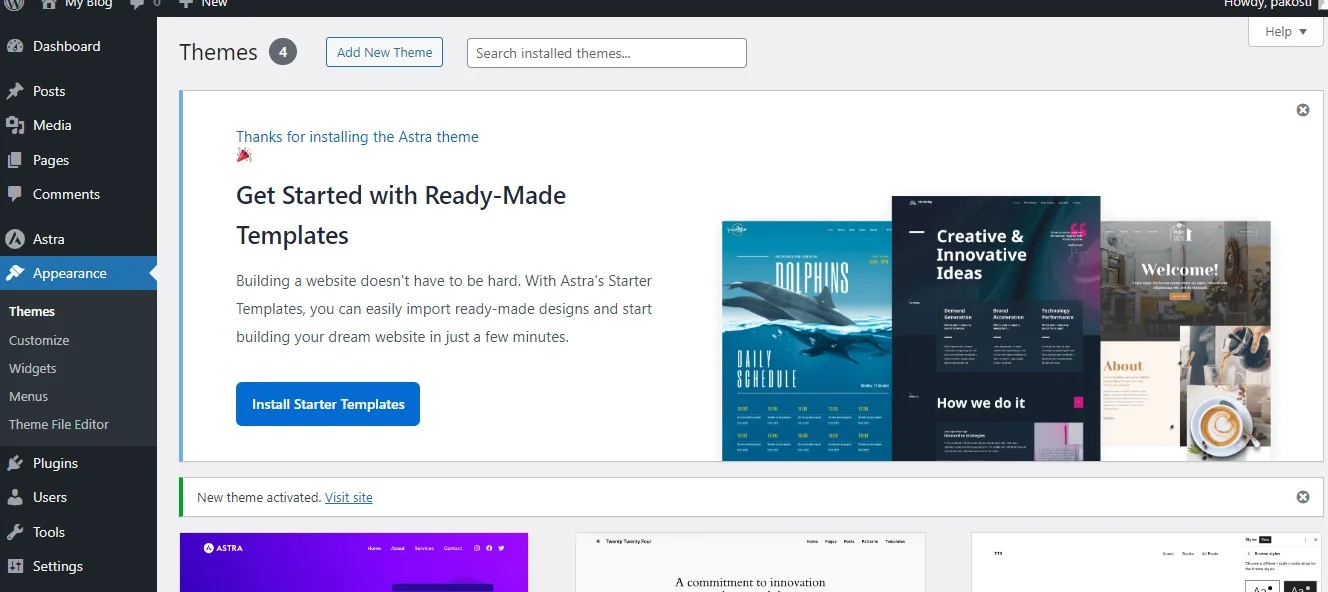
Step 1: Install and Activate Astra Theme

Go to Appearance from the Dashboard and then search for Astra in Themes.
Step 2: Install Starter Templates
You are only few steps away from a fully ready website.
Click on the button Install Starter Templates.

Proceed with Classic Starter Templates by choosing Build with Templates.

You will be asked to select a prefered page builder for your website!
WebsiteStarted is created using Elementor.
Good to know: Elementor is one of the most popular and massively-spread page builders being currently active on 8.8 million+ website with over 5 million active users! Source: CodeExpert
Step 3: Choose your Website Theme.

Themes are fully ready to be installed with the required plugins so the setups are already made for you!
We recommend not wasting too much time choosing a theme since you can always come back and replace it later.
After you choose the theme you will be asked to upload a logo and select colours for your website that you can always skip and continue for now.


Click on Continue and your site will be fully ready and installed!

That’s it! You have started a fully set-up your website with pages and plugins, just like that!
If you liked our guide on how to start a website, you are welcome to check out the additional steps below to start growing your website and audience, just like you created your website!

What is Next? Advices & Tips to grow
• Start to Optimize your Website
Search Engine Optimization (SEO) is a practice of optimizing a website to increase its visibility on Google or other Search Engines such as Bing and Yahoo. Here is a Free Basic SEO guide how to do it yourself for Beginners in 4 Steps!
• Set up a Google Analytics Tag
By setting up a Google Analytics tag from the start, you can track the number of visitors to your website and gain valuable insights into your web audience right from day one of your website’s existence.
Here is the easiest method on how to set up a Google Analytics tag on your website.
• Verify your Site in Google Search Console
With Google Search Console, you can optimize your website for better search rankings, attract more organic traffic, and ultimately grow your business.
Here are the 3 Easiest methods how to verify your website using Google Search Console.
Pro tip: We recommend you first install Google Analytics Tag. This will make it much easier for you to verify your Google Search Console Property!
• Set-up a Google Remarketing Tag
Setting up the Google Remarketing Tag on your website is absolutely worth it, even if you do not plan to advertise immediately after creating your website.
Similar to Facebook Pixel, it allows you to target visitors who have interacted with your website in the past, and this can be useful when you decide to start advertising in the future.
• Set-up a Facebook Pixel
By using a Facebook Pixel, you can reach people who are already familiar with your brand and have shown an interest in your products or services.
Facebook allows you to retarget all of your website visitors for up to 180 days.
Facebook’s official guidelines for installing a Pixel are straightforward and easy to follow, so you can install it yourself with little to no technical knowledge.
• Start collecting Subscribers
Here is an idea that many neglect and only wish they started way earlier!
Start to collect subscribers early on when your site is up and running!
By doing so, you can start building a list of people who have expressed interest in your product or service, and can later send them newsletters.
Not only is this a great way to differentiate from Google and Facebook but it is also FREE of Charge. Most softwares offer you free plans for up to 500 subscribers which is really outstanding for cutting on marketing costs!
Here are few E-mail Marketing Softwares that offer you a Free account and are extremly user-friendly for people who are just starting!
- GetResponse: Instant Chat Support and User-friendliness for Beginners
- Mailchimp: For Best Ease of use when creating campaigns
- HubSpot: All-in-one marketing automation.
- MailerLite: Affordable E-mail Marketing Plans
- Omnisend: Best for E-commerce Marketing
• Create a Google My Business Account
Do you have a physical location for your services or products? Do you want your location to be visible to them?
If yes, we really encourage you to make yourself available on Google My Business. Here is what you get out of it:
- Establish credibility and trustworthiness with potential customers
- Increase visibility in Google search results and Google maps
- Provide important information about your business, such as opening hours and contact details, which can improve availability and accessibility for customers
- Boost organic traffic in your local region through local SEO efforts
- Utilize Google My Business as an additional channel for promoting your products or services. That’s right, you can sell products through Google Shopping.
- Advertise news and events related to your business.
- Increase inquiries and leads through phone or email contact
In order to claim your Google My Business Account simply go to Google My Business and begin the process. It’s a simple and easy process that can have a big impact on your online presence and visibility!
• Set up a Google Recaptcha Anti-Spam
According to Statista, almost half of the e-mails sent worldwide are spam!
It is important to set up a Google reCAPTCHA anti-spam system for several reasons:
- Preventing automated spam: One of the main reasons to use reCAPTCHA is to prevent automated spam bots from accessing or submitting content on your website or app. reCAPTCHA uses a variety of techniques to verify that the user is a human
- Protecting your website’s integrity: If your website is flooded with spam or inappropriate content, it can damage the reputation and credibility of your brand.
- Using Google reCAPTCHA can also help maintain good email hygiene for your organization. By preventing automated spam bots from accessing your email system, you can reduce the number of spam emails that clog up your inbox and make it easier to manage and respond to legitimate emails.
- Build trust with your users and create a safer, more secure online experience for them.
When setting up a Google Recaptcha Anti-Spam for your website you will be asked for a reCaptcha type.
We find it best using Score Based (v3) reCaptcha that verifies requests with an auto-generated score by Google. This happens behind the scenes and it works best for us since it is user-friendly and the users do not have to take extra actions on our website.
We have made a quick guide how to How to add Google reCAPTCHA v3 in Elementor – in Less Than A Minute.
• Add a Cookies Consent Message on your Website
If you are already using tools such as Google Analytics, Google and Facebook Tags, and others, it means that you are collecting data about the user’s browsing behavior. This data can be used for various purposes, such as tracking website analytics or using their data for Remarketing Advertisement.
It is important to have a cookie consent message on your website that tells your users about this beforehand.
This way they have the right to make up their preferences as it is by law in many countries. For example, the General Data Protection Regulation (GDPR) in the European Union requires websites to obtain user consent before placing any non-essential cookies on their device.
This can be easily done using a Cookies Consent Message Plug-in. There are many great plugins out there that can do that for you.
First you will need to scan for cookies and then you will need to make a quick design of your cookie banner. CookieYes is a highly-customizable and gives you the full package for free! Here is how to install a Plugin in WordPress.